Network Options
The network options are categorized under Network. The following figure highlights the Network tab which displays network connections settings.
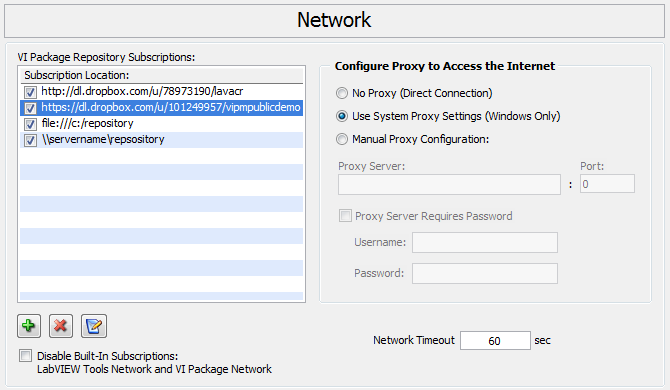
Figure 93 - Network options Tab
VI Package Repository Subscriptions: This is a list of networked repositories that you can access with VIPM. You can subscribe or unsubscribe to repositories from this list using the buttons below the list.
Add New Repository Subscription: Click to add a repository subscription. Please ask your repository administrator in your company for the name of the URL to enter when adding a repository.
Remove Repository Subscription: Click to remove a repository.
Some examples of Repository URLS:
|
http://abc_corp.com/repository |
You can serve your VI Package Repository using any web server. You will need to publish your repository folder via a web server. Clients will access the repository using an HTTP URL Use this type of URL if your clients are connecting externally and your repository is hosted on a web server. |
|
file:///C:/repository_path |
If your file sharing scheme makes the repository appear as a drive letter, clients will access the repository using a local path URL. Use this type of URL if your clients are connecting on your intranet and you require clients to use a mapped drive letter. |
|
\\PACKAGE_SERVER\share\repository_path |
File sharing is a simple and easy way to share your VI Package Repository with VIPM Clients. For windows (SMB) shares, clients will access the repository using an UNC path. Use this type of URL if your clients are connecting on your intranet and you allow access via UNC paths. |
Unchecking a subscription: will stop VIPM from connecting to the repository.
Disable Built-In Subscriptions: Check this option to disable access to the VI Package Network and the NI LabVIEW Tools Network. Both of these network subscriptions are built into VIPM.
No Proxy (Direct Connection): Select this when you are not connecting to the internet via a proxy server. You should also use this option if you are running VIPM under MAC OS or LINUX.
Use System Proxy Settings (Windows Only): This is the recommended setting for Windows users and should work for most situations including those where a proxy is used. VIPM uses the proxy settings on your system which were configured by your IT department or are set in Internet explorer.
Manual Proxy Configuration: Select this when you are connecting to the internet via a proxy server. The following settings are available for proxy server connections:
Proxy Server: Enter the proxy server IP address or server name.
Port: Enter the proxy server port.
Proxy Server Requires Password: Enable this if your proxy server requires a password.
Username: Enter the username required for your proxy server.
Password: Enter the password required for your proxy server.
TCPIP Timeout: Enter a value in seconds for an internet connection, after which VIPM will give an error indicating that it cannot establish a connection. If you receive many timeout errors then you should increase this value and try again.
After making desired modifications, pressing OK will save the changes and close the options window. Else, pressing cancel will close the options window without saving the changes.
If you have any feedback or questions (including ideas for other topics you'd like to learn more about), please contact us using our support page. We're looking forward to your feedback. All Contents, Copyright © 2006-2014, JKI. All Rights Reserved. |