Licensing & Activation
The Licensing & Activation properties page is available from the VI Package Builder window. This supports the Licensing and Activation toolkit from National Instruments.
More information about the Licensing and Activation Toolkit can be found at the Third Party Licensing & Activation Toolkit Community:
http://decibel.ni.com/content/groups/third-party-licensing-and-activation-toolkit
VIPM automatically handles proper installation of licensed LabVIEW libraries. If your package contains licensing and activation, VIPM will properly register your library with LabVIEW during installation. VIPM does all the hard work so you don’t have to.
There are two methods to implement licensing and activation for your VI package:
• Perform the library binding manualy using NI’s Add-On licensing tool.
o First perform the license binding on your library with the NI Add-On licensing tool. Note: this will license and lock your original source.
o Second, enter the License file path and library file path in the Licensing & Activation page.
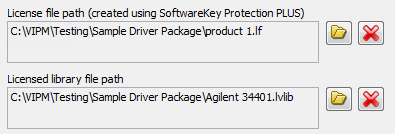
Figure 59 - Manual binding required fields.
§ License file path: This is the path to the *.lf file generated by SoftwareKey’s LFEdit program. Used to pull in other required information.
§ Licensed library file path: This is the path to the library file which you want to license.
• Let VIPM do the library binding: This method is more convenient because it allows you to preserve your original unlicensed source code.
o First, enter the License file path and library file path in the Licensing & Activation page (the same as indicated above)
o Second, enable the Bind license to library at build time checkbox.
o Third, fill in the information required in the License, Activation Methods and Library Protection tabs shown below.
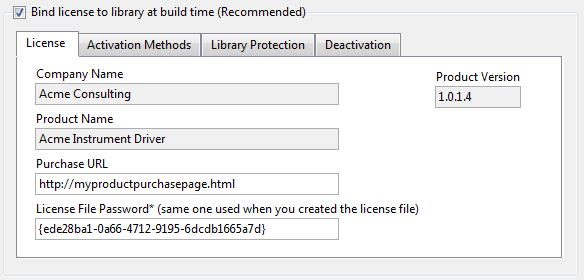
Figure 60 - Licensing & Activation dynamic binding properties
Company Name: This name appears in the Third Party Add-on Activation Wizard, where users activate add-ons. LabVIEW also uses the company name to identify the directory to which the add-on installer installs the add-on license file on users' computers.
Product Name: This name also is the add-on name that appears to the user when the user activates the add-on.
Product Version: This version also is the add-on version that appears to the user when the user activates the add-on.
Purchase URL: SOLO Server purchase URL for product (not required). This URL is launched in the default web browser of target machines if they wish to purchase the add-on from within the activation wizard.
License File Password: This is the password used when you created the license (lf) file with the SoftwareKey LFEdit application.

Figure 61 - Licensing & Activation - Activation Methods
Web Activation URL: Web URL if you want to show a webpage where end users can go to get manual activation codes.
Phone Activation Number: Phone number if you accept activations over the phone.
Automated Online Activation URL: This is the SOLO Server Activation URL for your add-on. This is the URL that is launched by the default web browser on the target machine when they want to log-in (using a license ID and password you provide) to get activation codes. This is also used to compute the automatic activation address. You can choose to allow automated online activation only if you have a SOLO Server license.
Note: Must be of the form http://solo-instalation-server/ …/unlock/

Figure 62 - Licensing & Activation - Library Protection
License Sublibraries: If this is enabled then if the library (.lvlib) contains other libraries, they will be licensed with same license file. If this is disabled then only the main library will be licensed.
Password type: This is the password to use for locking your licensed library (.lvlib). VIPM will apply this password to the library before it is built into a package.

Figure 63 - License & Activation – Deactivation
Enable Deactivation: Determines whether or not users can deactivate the add-on. This allows users to transfer a licence to a different computer.
Note: Log into your SOLO Server account and select Authors»Products»Encryption Key Data to access the information for Key ID, Client Key, and Server Key.
Encryption Key ID: Specifies the Encryption Key ID associated with your Instant SOLO Server account.
Client Key: Specifies the Client Key (XML) associated with your Instant SOLO Server account.
Server Key: Specifies the Server Key (XML) data associated with your Instant SOLO Server account.
If you have any feedback or questions (including ideas for other topics you'd like to learn more about), please contact us using our support page. We're looking forward to your feedback. All Contents, Copyright © 2006-2014, JKI. All Rights Reserved. |