Palettes

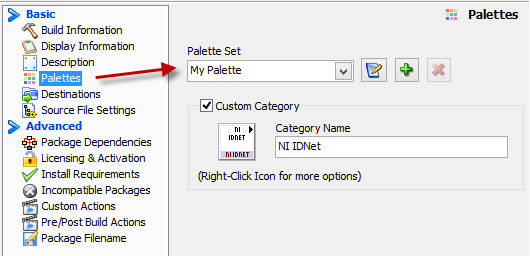
This page, of the VI Package Builder window, allows you to edit the palettes which show up in LabVIEW when your package is installed. If your package does not require a LabVIEW palette you can disable the checkboxes next to the Functions and Controls Palette.

Palette Set: Here you can create multiple palette
sets. By default LabVIEW requires just one palette set which targets the default
LabVIEW desktop installation. However, itís possible to create multiple palette
sets. For example you can create a palette set that targets the LabVIEW FPGA or
LabVIEW Real-Time development environment. Just click the  button to add a palette set. Click the
 to delete it. You cannot delete the
last palette set. You must have at least one.

Another use for a custom palette set is if you need to create a special palette which will be included inside of a class or Library.
Custom Category: When this checkbox is enabled, this allows you to locate your palettes beneath a custom category subpalette. This is useful for example if your company produces multiple products that need to be grouped under a common palette Icon.
Custom Category Icon: You can edit the icon by right-clicking on it and selecting Edit Icon from the menu.

You can also have VIPM autogenerate an icon for you based on the company name. Just select Autogenerate Icon from the right-click pop-up menu.
Category Name: Enter a category name that will appear in the title of the subpalette category in the LabVIEW palettes.
Note: Each package your company distributes should define your companyís palette category. This ensures that the category icon will appear correctly. If multiple packages are installed that define the same palette category, VIPM will ensure that the latest version of your category icon is used. It does this by only replacing the palette category's icon, if the one to be installed is newer than the one already installed.
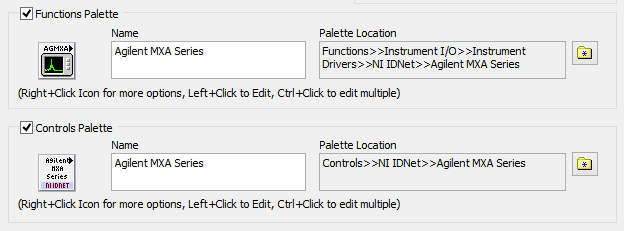
Functions\Controls Palette: Enable this checkbox to create a functions or controls palette. If your product does not require a LabVIEW functions or controls palette you can disable this checkbox.

Name: Enter a name for the functions or controls palette here. This is displayed as the title for the palette when installed in LabVIEW.
Installation Location: This is the virtual palette location of your palette in LabVIEW. In the example above, we see that the functions and controls palette will be installed under the Acme Products subpalette of the Main functions and controls palette.
In order to change the location
of your functions or controls palette, click on the  button. This will bring up the Palette Category Browser Dialog.
Editing the base icon: You can edit the base palette icon by right-clicking on the icon and selecting Edit Icon from the menu.

Edit Palette: Allows you to do advanced palette editing. Tip: You can also edit the palette by just clicking on the icon. See the Editing the Palettes section for more details.
Edit Icon: You can edit the icon by right-clicking on it and selecting Edit Icon from the menu. This will open the LabVIEW icon editor.
Import Icon: This will allow you to import an existing 32 x 32 image in jpg, png or bmp format. You can also import an image from an mnu (palette) file.
Edit Description: This will allow you to edit the text that appears in the Context Help window if you move the cursor over the palette icon in the Controls or Functions palettes. You can format the text in the description (using <B></B>) to appear bold in the Context Help window.
Autogenerate Icon: This will have VIPM autogenerate an icon for you based on the product name and company name.
Autogenerate Icon & Palette: This will have VIPM autogenerate an icon for you based on the product name and company name. This also deletes all palette customizations and restores it to the default, auto-generated state. For example, if you rearranged your palette icons, then they will abe reset.
 Add Palette to Library or Class
 Palette Category Browser Dialog
If you have any feedback or questions (including ideas for other topics you'd like to learn more about), please contact us using our support page. We're looking forward to your feedback. All Contents, Copyright © 2006-2014, JKI. All Rights Reserved. |