How do I configure VIPM to use a proxy server?
VIPM will try to use your Windows system proxy settings configured by your IT department. This is the default behavior and should work on most Windows systems.
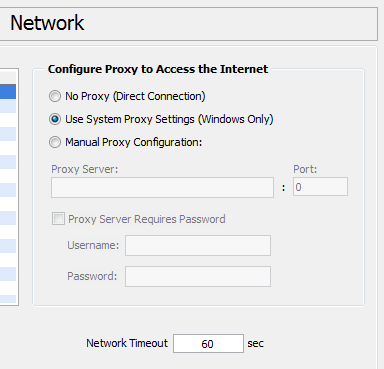
Figure 1 - Internet Preferences page of the VIPM Options dialog.
You can configure a custom proxy by selecting Manual Proxy Settings. In order to do this, you will need to know the proxy server’s hostname and (TCP) port, and enter this information into the Internet Preferences page of the VIPM Options dialog. Commonly, the hostname and port is specified in the format servername:port. For example, this could be specified in a format like those shown below:
proxy1:80
www.yourcompany.com:8080
proxy2.yourcompany.com:80
You can find out if your network has a proxy server (and what its name and port are) from your IT department. You can also find out this information by looking at the connection settings of your web browser. Some web browsers use an auto-configuration URL for proxy setup. If your web browser uses an auto-configuration URL, try entering this URL into your browser’s address bar and looking at the resulting information. If you may see something like the following:
PROXY www.yourcompany.com:8080
You can try copying this into VIPM
Some proxy servers require a username and password. If this is required you can fill this information in the options as well.
If you have any feedback or questions (including ideas for other topics you'd like to learn more about), please contact us using our support page. We're looking forward to your feedback. All Contents, Copyright © 2006-2014, JKI. All Rights Reserved. |